Installing Windows on a USB drive can be a valuable skill in a variety of circumstances. This allows you to carry a portable operating system with you, allowing it to work on any compatible computer. Whether you are a tech enthusiast or someone in need of a portable OS, this step-by-step guide will walk you through the process of installing Windows on a USB drive.
Benefits of Installing Windows on a USB Drive:
Before we begin, let's explore the advantages of running Windows from a USB drive:
- Portability: With Windows on a USB drive, you can carry your personal operating system wherever you go. Plug it into any compatible computer, and you're ready to work on your own customized environment.
- Privacy and Security: By using a USB drive as your operating system, you can protect your data and ensure that your online activities leave no traces behind. This is particularly useful when working on public or shared computers.
- System Recovery: Having a bootable USB drive with Windows allows you to troubleshoot and recover your system easily in case of crashes or errors.
Requirements for Installing Windows on a USB Drive:
To proceed with the installation, you'll need the following:
A USB drive: Ensure you have a high-quality USB drive with a minimum capacity of 16GB for optimal performance.
Windows ISO file: Download the Windows installation ISO file from the official Microsoft website or acquire it through legal means.
or click here to download directly.
| 💿Windows 7 Downloade | Click Here |
| 💿Windows 10 Downloade | Click Here |
| 🌎 Convert dynamic disk to basic disk | Click Here |
| 🌎 Remotely Access C Drive on Windows | Click Here |
| 🌎 how to Fix Wi-Fi connection problems | Click Here |
| 🌎 Enable edge search bar on desktop | Click Here |
| 🌎 How to Remove / Disable LockPW | Click Here |
| 🌎 Hindi Typing Kaise Kare with Google Input Tool | Click Here |
| 🌎 Recent-post | Click Here |
| 🌎 Home-page | Click Here |
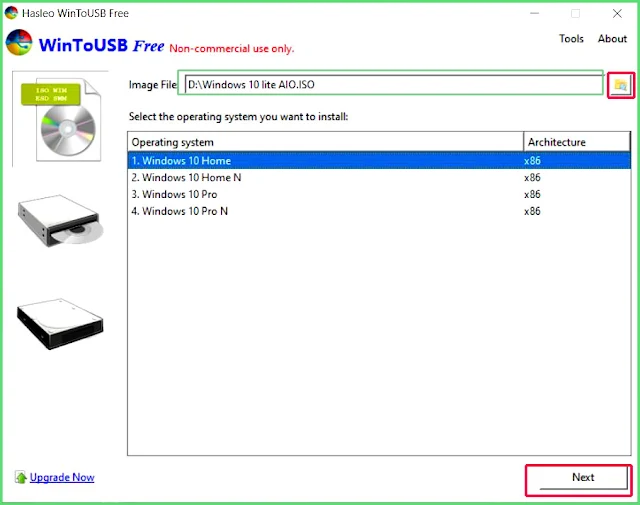
Rufus or WinToUSB: Choose either Rufus or WinToUSB, both popular software tools used to create bootable USB drives.
| WintoUSB Downloade | Click Here |
Creating a Bootable USB Drive:
Launch Rufus or WinToUSB: Open the software tool of your choice.
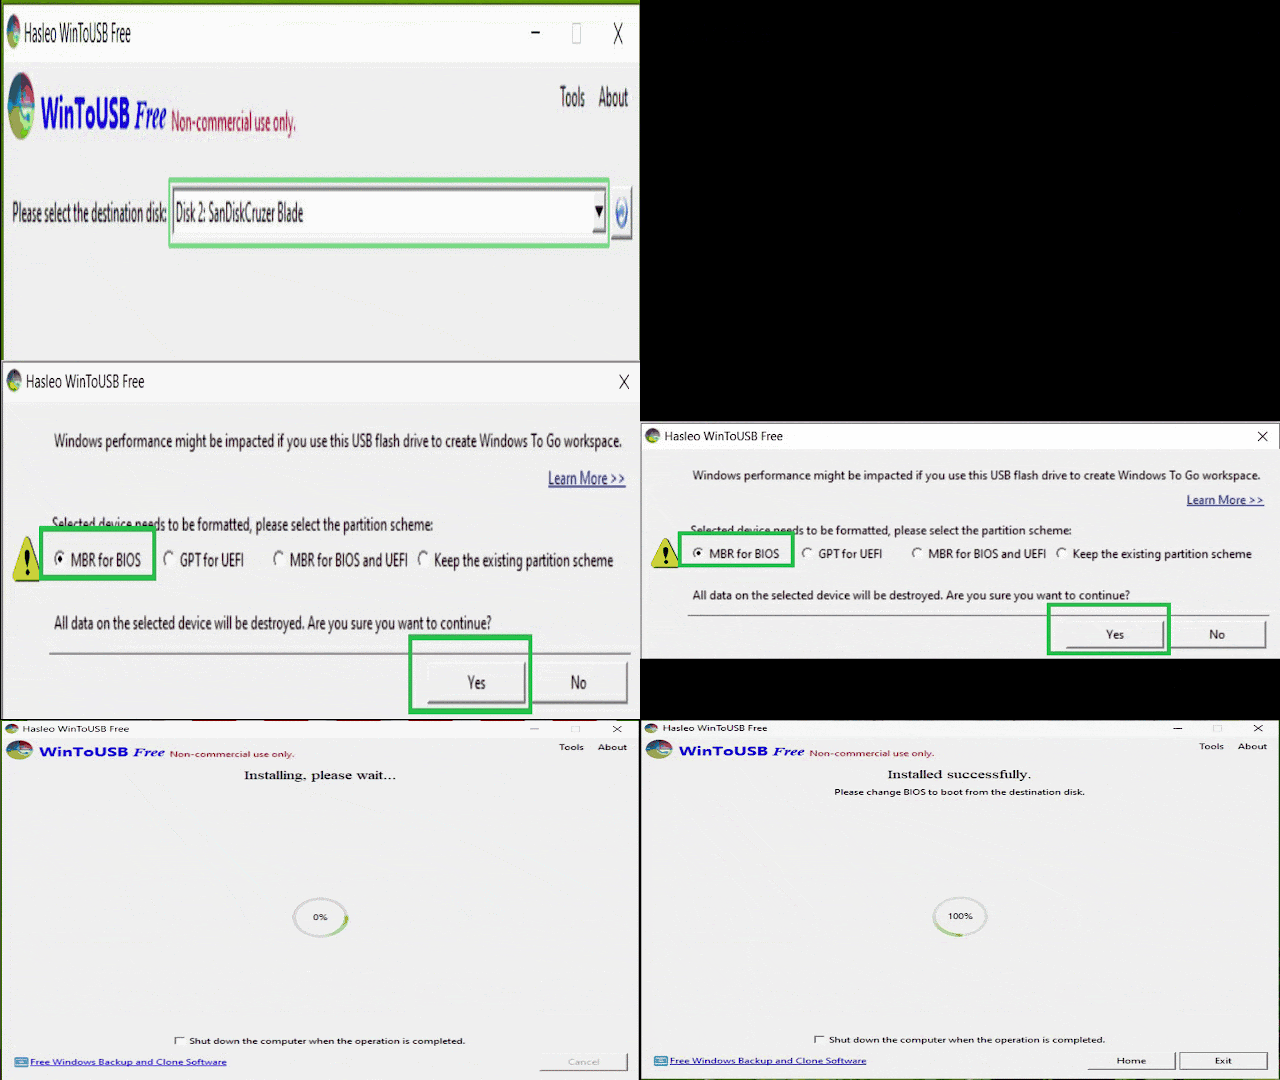
Select the USB drive: Ensure the correct USB drive is selected within the software.
Configure the settings: Depending on the tool you're using, you might have additional options to customize, such as partition scheme, file system, and cluster size. It's recommended to stick to the default settings for most users.
Begin the process: Click the "Start" or "Create" button to initiate the creation of the bootable USB drive. Note that this process may take a few minutes.
Booting from the USB Drive:
Connect the USB drive: Insert the bootable USB drive into the computer you want to install Windows on.
Access the BIOS settings: Restart the computer and enter the BIOS settings by pressing the appropriate key during startup (usually F2, F10, or Del). The key might vary depending on the computer manufacturer. Or restart the computer and continue press boot key(F2,F9, or F12 )key for direct boot.
Set USB as the boot device: In the BIOS settings, navigate to the "Boot" or "Boot Order" section and prioritize the USB drive as the primary boot device.
Save and exit: Save the changes made in the BIOS settings and exit. The computer will now restart.
Installing Windows on the USB Drive:
Windows installation process: Follow the on-screen instructions to install Windows as you would on a regular computer. Select the USB drive as the installation destination when prompted.
Complete the installation: Wait for the installation process to complete. This might take some time, so be patient.
Customize settings: Once Windows is installed on the USB drive, you can personalize the settings according to your preferences.
Ready to Go!
Congratulations! You've successfully installed Windows on a USB drive. Now you have a portable operating system at your disposal.
Conclusion:
Installing Windows on a USB drive provides flexibility, portability, and security, making it an invaluable tool.


~3.jpeg)

